DSLR photography guide by Tim Leach
Posted by TimL
1. Introduction
The photography guide has been inspired by NatureMapr’s Mission to ‘Empower anybody to report plant or animal information anywhere in Australia and ensure the information gets to the people that need to know about it.’ To this end, one of NatureMapr’s primary values is ‘the nurturing of learning and knowledge sharing.’ Therefore, the intent of this NatureMapr dSLR photography guide is to contribute to this primary value by sharing associated photographic knowledge, experience and lessons learnt by one of its contributors and hopefully by more of its contributors in the future.
2. Purpose of the DSLR Photography Guide
The overall purpose of the Guide is to aid NatureMapr contributors of all skill and experience levels to develop their personal photographic and citizen science skills and thereby maximise the value of their own work and the value of their contributions to NatureMapr’s database. The broader outcome will be added value for the scientific community and those that rely on that database.
The Guide is not intended to be an instruction manual or an authoritative description of either photographic techniques or photographic subjects. The Guide is written from the author’s personal perspective and interests and as such will not suit all NatureMapr contributors. The author’s intent is to inspire NatureMapr’s contributors in their work and interests, to optimise their photographic skills, their output, and the personal value of their work. NatureMapr contributors should take from the Guide what they will and apply their subsequent knowledge and experience to their contributions, and thereby nurture the NatureMapr community. In the author’s view, the complete process of taking the types of images that suit you and contributing them to the citizen science community via NatureMapr, should suit your interests, your style, and be rewarding, creative and enjoyable for you.
3. The Author
As a contributor to NatureMapr for several years, I’ve been asked to help develop the Guide. I’m a self-taught, dSLR (digital single-lens reflex) camera photographer with a long-term interest in Nature photography and in particular, digital macro photography of insects. The information and guidance covered in the Guide therefore frequently refers to dSLR camera type photography and to macro photography of insects. However, the Guide is intended to be sufficiently general that it can be applied to other types of photography and subjects that regularly feature on NatureMapr. (NatureMapr may produce other photography guides to meet the need).
The Guide has been written from the perspective of my personal photography style, what I do, why, and how I do it. It is not intended to be a comprehensive technical photography guide. It should be seen as providing broad, practical, experience-based guidance to NatureMapr contributors, both those who are new to the platform and to photography, as well as the more experienced. The Guide is intended to be a living document, subject to continuous development and improvement as the knowledge and experience of NatureMapr’s contributors grows. As such, NatureMapr’s contributors are encouraged to provide feedback and to consider providing similar guides for other forms of photography and other subjects.
4. NatureMapr Contributions
The Guide is first and foremost intended to help contributors with their NatureMapr contributions so before getting into any great detail, the following is some relevant guidance on my particular approach to contributions.
Helping Moderator Identification
NatureMapr contributions inform Citizen Science and thereby those who rely on that information and its scientific value. An important part of the process is the NatureMapr moderators who assess contributions and use their knowledge and experience to identify the subject matter as accurately as they can. NatureMapr contributors can help moderators with their identifications by providing as much relevant information as they can through clear images, with different perspectives, and with descriptive commentary on the upload page.
Contribution Image Limits
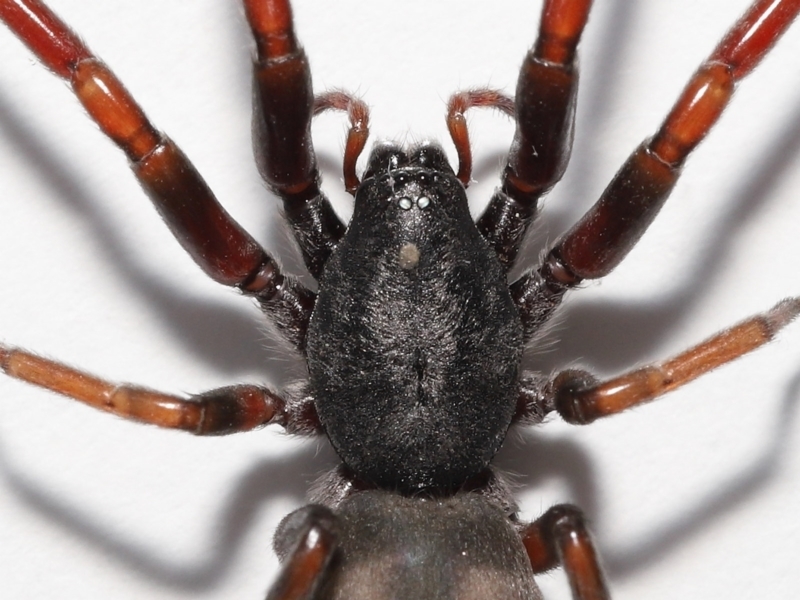
NatureMapr has a 5-image upload constraint for any particular contribution. I therefore try to provide five different perspectives of the subject where possible so that moderators have as much information as possible. If additional images beyond the 5-image constraint can help identification (such as close-up detail of the underside of a spider) then I provide a second contribution of ‘details’ and link the two via the upload page ‘edit’ function to cross-reference the sighting numbers of each contribution.
Perspectives
I try and photograph front, sides, top and underside views of subjects such as insects. Where possible I take side views looking straight on to the insect’s body because with macro photography’s narrow depth of field, this maximises the length of body that’s in focus. If the side view is taken at an angle to the body rather than straight on, this can adversely affect how much of the subject is in sharp focus and miss important identification details.
Multiple Images
I typically take many images of a particular subject rather than just five. With macro photography, the depth of field (the distance in front of and behind the camera’s point of focus) can be wafer thin and with live, active and wary insects, different parts of the image will be in focus and out of focus. By taking several images of the same perspective (i.e., several images of an insect’s side) I can select which images maximise the information available to NatureMapr’s moderators.
Commentary
Together with my contributions I try to provide commentary on anything that might help identification such as the subject’s behaviour, environmental conditions, any interactions, anything unusual etc. Comments are added in the box provided on the upload form. Whilst this may seem unimportant, it provides record information which may help with identifying the subject or record details of the associated environment, the subject’s behaviour and the like.
GPS Coordinates
When uploading images, I check that the GPS coordinates on the upload page’s ‘location information satellite view’ have accurately recorded the subject’s location. GPS is subject to location errors and can provide false records such as placing a subject within a river rather than adjacent to it.
Image and File Sizes, Aspect Ratios
I always process images before contributing them to NatureMapr and always work with copies of the original files and not the originals, as this provides backup should I make irreversible mistakes. Before uploading images I resize them to an appropriate viewing size (e.g., with a 4:3 aspect ratio image I use 1200 x 900 pixels rather than say the file’s original 1320 x 990 pixels). I also adjust the file size (e.g., 400KB rather than say 5MB) such that file size is no larger than necessary whilst maintaining sufficient image quality for the moderators. I consider the image composition that best suits the orientation of the subject within it (e.g., a landscape orientation to suit a predominantly horizontal subject and a portrait orientation to suit a predominantly vertical subject). I review the aspect ratio of the image in relation to the subject and tailor it to suit (e.g., a long thin horizontal caterpillar may look better with a 3:2 aspect ratio image rather than a 4:3 aspect ratio whilst a tall thin vertical caterpillar on the side of a tree may look better with a 2:3 aspect ratio rather than a 3:4 or 4:3 aspect ratio).
Subject Identification
When contributing images, I try to be as specific as possible with subject identification. For example, NatureMapr has many insect moderators, each with their own area of expertise. A contribution only identified as ‘an insect’ won’t necessarily be viewed by the appropriate subject matter moderator. It’s better to broadly identify an unknown insect (e.g., ‘an ant’ rather than ‘an insect’) which then allows the relevant moderator to view the sighting and either confirm the identity or redirect the sighting to the appropriate moderator.
Camera Date and Time Settings
When packing my camera equipment for the day I check that the camera date and time settings are accurate as this information is important for NatureMapr’s records and for moderators. (This is particularly important when daylight-saving occurs).
Timeline Photography
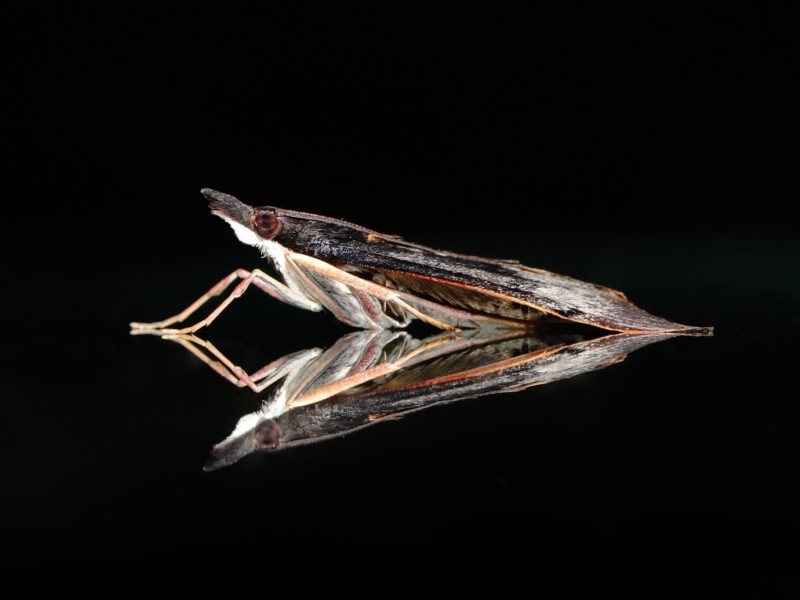
NatureMapr’s knowledge base can provide moderators with valuable information that spans time. For example, how long does a particular species endure at a particular location? At what time of the year does a particular subject become active? What does the long-term photographic record show? A recent example of timeline photography is a Two-tailed spider that was photographed at the same location over several months. The spider’s body markings confirmed that it was the same individual successfully hiding in plain sight and catching prey over a period of several months and through all sorts of weather conditions. NatureMapr’s data can now provide evidence of this type of spider’s behaviour.
Ask the Experts
NatureMapr’s moderators are experts in their particular field and as such, can advise on what specific features and photographic details are necessary to help them identify contributors’ sightings. The following are examples of advice I’ve received (copied here with thanks to the NatureMapr experts):
How to photograph and identify small mammals: “Identification of small mammals from photos is uncertain. It helps to have a measuring scale in all images and to have multiple images showing the entire tail, the ratio of tail length to body length, the pads under the feet, the nature of the ears including how far the ears reach in relation to the eyes when folded forward and any head or face markings.”
Important features to help with identification of Bearded Dragons: “… head and neck photos from above…spines across the rear of the head…beard shape…spines along the lower flanks…scales at the base of the tail…head scales and lateral scales… the front of the snout.”
It's clear from this advice that when unsure what features to photograph for any particular subject all contributors have to do is ‘Ask a NatureMapr expert’ via the message tab on the particular expert’s page.
All Contributions are Valuable
I never consider a particular sighting or subject to be too insignificant or too commonly recorded on NatureMapr to be of any value. Every contribution adds to overall knowledge in some way. At its simplest, a contribution adds to the record of species distribution. The most insignificant sighting may have important information that is not immediately obvious to the contributor but invaluable to NatureMapr and its moderators. For example, close inspection of a nondescript ant contribution showed it had a Slug mite attached to it.
5. My Personal Approach to Photography
As mentioned above, NatureMapr has asked me to develop the Guide as an aid to help its contributors develop their personal photographic skills and thereby, citizen science skills. To this end, this section of the Guide describes my personal approach to dSLR macro photography of insects and the like. It is intended to be sufficiently general that it can be applied to other types of photography and other NatureMapr contributions.
Camera Equipment
This description of my camera equipment should place my comments into context. There are two important things to note here. First, I’m not recommending any particular manufacturer’s camera equipment but simply describing what I am familiar with and use because I’ve developed an understanding of the particular equipment controls, capabilities and importantly, its limitations. Second, camera equipment is a tool like any other, that helps the photographer to perform a particular task. NatureMapr’s contributors don’t necessarily need high-end camera equipment or complex technical photography knowledge to produce stunning images or make valuable NatureMapr contributions and grow their own personal skills. NatureMapr’s database is proof of this. Equally important are the inspiration, skills, imagination, enthusiasm and artistic flair of the contributor.
I mainly use a hand-held Canon 6D Mk 11 full-frame camera together with a Canon 600EX11-RT Speedlite flash unit. The camera is used with controls set to ‘manual’ rather than ‘auto’ as explained below.
I need lenses that are versatile enough to photograph all manner and sizes of insects as well as photograph larger subjects such as a chance sighting of a Wombat, and vistas near and far such as landscapes and the Milky Way. I mainly use a Canon EF 100 mm 1:2.8 L IS USM macro lens complete with a UV filter (the latter for physical protection of the lens). This lens can be manually focussed or automatically focussed via its ultrasonic beam and comes complete with image stabilisation. These are all important features for macro photography of small subjects up to a magnification of 1:1.
For magnification within the range of 1:1 to 1:5 I use a Canon MP E-65 f2.8 macro lens complete with a Canon MT-24EX Macro Twin Lite flash unit. The lens is manually adjusted for focus and magnification and doesn’t have image stabilisation. This lens and flash unit require a bit more skill and care to use, particularly with very small, active and wary subjects.
The camera, lenses and flash units are used for taking single-shot images, mainly of insects, year-round and in all weather conditions. (They are also used for photography in sub-zero temperatures, presently down to -35°C). Taking single images at macro scales means that parts of an image will be out-of-focus and not as uniformly sharp as it could be, depending on the perspective and particular depth of field. To overcome the out-of-focus/sharpness issue I also use a technique called ‘focus stacking’ where the camera is attached to an adjustable focus rail and takes multiple images of the same subject, each with a slightly different focal point. When used with an appropriate image stacking program, one final, sharp and completely in-focus image is produced. Whilst I’ve used the focus stacking technique for some image contributions to NatureMapr, this Photography Guide covers single image photography. Separate guides for focus stacking techniques and sub-zero temperature photography are subjects for the future, should this be of value to NatureMapr contributions.
Flash Unit Use
As previously mentioned, I use flash units for macro photography. Whilst this does not suit all photographers, it provides me with consistent output quality as well as the necessary degree of control over the subject and its background, the lighting conditions and colour, the overall range of images, and the final images contributed to NatureMapr. Considerations and benefits of this approach include:
- Insects are generally wary of being approached very closely by a camera lens and may try to escape as I take an image, which would blur the image. In this situation, using high-speed synchronised flash produces sharp images.
- Many insects are startled when a flash goes off. Small flies in particular react very fast and will usually jump as the image is taken, causing a blurred image. Camera movement caused by pressing the shutter release button can also blur images. To overcome these issues, I use high-speed synchronised flash, meaning that both flash units can be synchronised with the camera shutter speed and controlled such that the shutter opens and closes during the short time that the flash unit operates. I use a minimum shutter speed of 1/1000s and preferably faster.
- Many of my subjects are found hiding within dense, dark foliage, which needs to be gently moved out of the way before I take images. The flash unit provides the ability to take bright, sharp images in these conditions whilst holding the camera and flash unit with one hand, leaving the other hand free to move foliage out of the way.
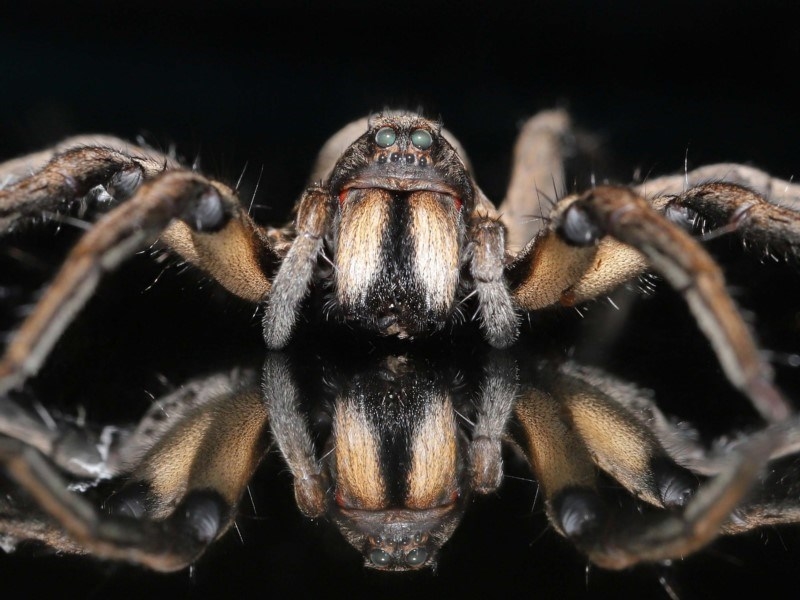
- Flash units can startle insects, spiders, skinks and other photographic subjects. To overcome this, I usually start taking images some distance away from the subject and gradually move towards it taking additional images. With subjects such as spiders, flies and the like, I also start taking images from in front of them rather than from the side. The flash appears to temporarily overwhelm their vision and make them less likely to try and escape. My experience has been that insects and the like generally become conditioned to the flash unit if I use these techniques, allowing me to get close to them, within the limiting distance of the macro lens.
- At the magnifications I use (1:1 up to 1:5) the depth of field (the space of best focus in front of and behind the focal point, where the subject appears sharpest) is very thin, even when compared to the size of small insects. The consequence of this can be that when pressing the camera’s shutter release button, the slight pressure involved can move the focal point away from the subject, resulting in blurred images. This is particularly the case when operating the camera in automatic mode (where the camera sets all of the controls to suit the subject) rather than manual mode (where the photographer sets all of the controls). My experience has been that using manual mode together with high shutter speed and high-speed synchronised flash typically compensates for camera or subject movement whilst taking an image.
- The type of flash I use has the light source set up high above the camera rather than low down directly on top of the camera. This has the benefit of minimising flash reflections from subjects (such as overly bright reflections in insect eyes) and spreading the light from the flash over the subject and its surroundings, rather than an overwhelming flash concentrated on the front of the subject. The flash has an integral diffuser to spread the light and to reduce bright reflections to some degree. Additional diffusion can be achieved by fixing a couple of layers of polystyrene tissue over the diffuser. In my experience this provides satisfactory diffusion and colour balance.
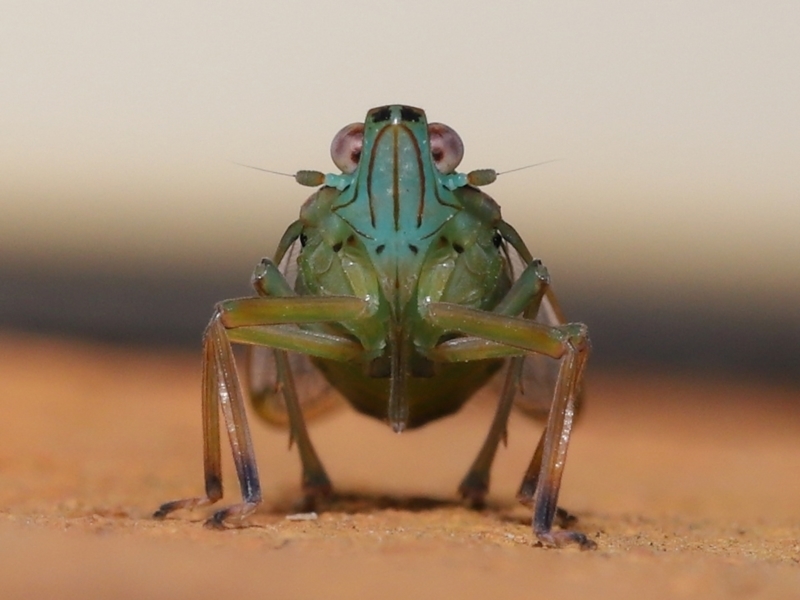
- At the macro scales I use (the insects can be less than 1mm long) the subjects typically form a very small part of the overall camera frame size and usually appear in the centre of the frame. Consequently, I use the camera’s autofocussing (AF mode) set to spot metering such that the camera and flash unit respond to conditions at the centre of the frame where the subject appears. This is in preference to a broad multipoint setting which would cause the camera and flash unit to respond to conditions in areas of the camera frame that are remote from the subject and of no interest. The centre of the frame is where the subject sits and where I’m aiming to get information, so that is what the camera and flash unit respond to. This approach is particularly important when taking images of small subjects at night when a large part of the camera frame surrounding the object may be black and of no interest.
Camera Stability
Tripods can provide a stable camera base which improves the technical quality of images, particularly their sharpness. However, most of the subjects I photograph are active or in difficult to access locations not suited to tripods. I therefore use other techniques to produce sharp images and typically only use a tripod for focus stacking.
In preference to a tripod, I control the hand-held camera settings manually (rather than use auto settings). The manual settings are adjusted as described later in the Guide and when used together with a high-speed synchronised flash unit, this adequately compensates for any camera or subject movement.
When taking images of subjects on surfaces such as tree trunks, I also stabilise the hand-held camera by placing an outstretched arm against the tree and rest the camera on my arm to provide a stable base.
Batteries
I use rechargeable batteries for the camera and flash units and always carry fully charged spare batteries to avoid missing a potentially valuable sighting.
Memory Card Capacity
Before taking images, I ensure that the camera’s memory card has sufficient free storage capacity for the day. If the card fills up whilst photographing, then valuable sightings can be lost.
Processing Images
I always take RAW images (an image file produced by the camera that has a minimum amount of in-camera processing) and work on copies of those images to produce final JPEG images for NatureMapr. Working on copies of the original RAW files provides backup should image processing go horribly wrong.
Artistic Appreciation
Where possible, I try and produce images that don’t just contain factual information. I believe that images with some degree of artistic appreciation for the subject are more likely to inspire others.
6. Technical Matters
This section of the Guide provides some guidance on technical and practical matters that should be considered before, during and after taking images. This is based on my personal experience and is not intended to be an authoritative description of photographic techniques that NatureMapr contributors must follow.
Check Equipment Settings
I always check the camera settings after removing it from a camera case or backpack. Camera controls that protrude from the camera body (the mode and main dials, quick control dial and various push buttons) can be inadvertently altered as the camera is removed. If this is not corrected at the time then it can adversely affect my images, particularly if I am in a hurry to take them.
Similar comments apply to flash unit settings where the high-speed flash synchronisation or flash output can be inadvertently altered to the detriment of the images. This particularly applies when changing flash unit batteries with the unit turned on. With some units this can unwittingly reset the unit.
When using my through-the-lens camera I always check the dioptric setting of the eyepiece viewfinder before and during imaging. This is particularly important because the dioptric adjustment wheel can be inadvertently moved when removing the camera from a case or backpack or when handling the camera during use. This is not so important when the camera lens is set to autofocus, but where manual focus is required (e.g., because the autofocus beam may not work correctly under certain conditions as described below) then the correct dioptric setting for my eyesight is important for taking sharp images.
Lens Protection
Where necessary, I use a UV(c) glass filter on the front of the lens for ultraviolet light control. Importantly, the filter also protects the macro lens from scratches, dust and the like when not in use. When taking macro images of insects, I typically remove the glass filter as it is unlikely to match the optical quality of the macro lens. It is also another surface for dust to collect on, and it may unnecessarily degrade the final quality and sharpness of the image.
Camera Equipment Cleanliness
It’s important to maintain camera equipment cleanliness and have it immediately ready to use when needed. Dust and other contaminants on the lens or camera sensor can be a serious problem at macro scales where the subject can be quite small, and the contaminants can coincide with important features of the final image. I use an air blower for dust removal from the camera sensor, being careful to follow the manufacturer’s instructions and avoid sensor damage.
As photographing insects often requires using the camera in bushes, grass and the like, the front of the lens frequently collects dust, pollen and other contaminants that will degrade image quality if not removed. I regularly check the front of the lens during a photography session and wipe the front of the camera lens with a soft, anti-static cleaning cloth before and during the session.
Contaminants also can be generated within the dSLR camera body (e.g., by the mirror mechanism inside reflex cameras) and can be picked up when changing lenses. Consequently, I regularly inspect and clean the rear of the camera lens.
If all else fails and I end up with dust spots on my images, I remove them during processing of the RAW digital images, before uploading the final images to NatureMapr.
Aperture, Focus, Depth of Field and ISO Settings
There are a few issues to be overcome with macro photography where small, active and wary subjects such as insects are involved. As described above, at the magnifications I use for macro photography (1:1 up to 1:5) the depth of field is very thin even when compared to the size of small insects. The depth of field can be controlled to some extent for specific camera and lens combinations by adjusting camera settings and lens characteristics. These include varying the aperture size (the hole through the lens diaphragm that lets light through to the camera sensor), using a lens with an appropriate focal length, and varying the focus distance between the subject and camera. Of these, the aperture size provides significant control of depth of field and image sharpness.
Within a camera lens there is an adjustable diaphragm that forms an opening (aperture) through which light rays pass to the camera sensor. The size and shape of that opening control the light rays. As the aperture size is reduced, the shaft of light rays passing through the diaphragm becomes smaller and this has the effect of preventing those rays from spreading out and causing a less sharp image on the sensor. However, it doesn’t follow that reducing the aperture size ever smaller will result in increasingly sharper images at the camera sensor. There is a limit to the effectiveness of this sharpening effect for the following reasons.
Light rays have the characteristics of waves. When light rays pass through very small openings they tend to diffract (spread out) around the perimeter of the opening. With a camera lens, this spreading out of the light rays at the perimeter of the diaphragm opening causes interference of the waves at the focal plane (the camera sensor) and consequent blurring or softening of the image. The different colours making up the light rays also spread out by different amounts as the diffraction occurs and take different paths to the camera sensor. This causes chromatic aberration which is the different colour fringes that sometimes appear around the edges of objects within an image. To compound this issue, the aperture opening through the diaphragm is not necessarily a perfect circle but most likely a polygon shape, which also adversely affects images at macro scales.
The camera lens I mainly use for macro photography has 22 available aperture settings which vary from f2.8 (diaphragm at maximum opening size) to f32 (diaphragm at minimum opening size). Manually adjusting the aperture from maximum to minimum opening size (i.e., from f2.8 to f32) does not result in ever increasing image sharpness for the reasons described above. I’ve determined by trial and error that for my type of photography and the combination of camera equipment I use, I get the sharpest macro images when the aperture is set around f11.
My experience has been that learning to use a DSLR camera with ‘manual’ control settings rather than ‘automatic’ settings, is important when it comes to producing images that most suit my photographic equipment and personal style. With the camera operating on ‘automatic’ settings, the aperture size, shutter speed and other settings are automatically adjusted by the camera’s controls and will not necessarily produce a macro image that maximises image sharpness or depth of field relative to the subject size. In my view, learning to use the camera on ‘manual’ setting is an important part of maximising image quality.
Regarding shutter speed, most macro subjects I photograph (insects, spiders and the like) are typically small, nervous and feel threatened by the proximity of the camera equipment and the photographer. Most will either try to escape from the perceived threat or will move around and flinch nervously, which can blur the resulting image. In this situation, a fast shutter speed is essential to get sharp images particularly where very small subjects are involved and where the camera lens is very close to them. I typically use a shutter speed of 1/1000s and preferably faster, up to 1/2000s. To put this into context, whilst this speed might seem unnecessarily fast, when photographing subjects such as long-legged flies with their metallic green bodies, the flies appear to be sensitive to the camera lens ultrasonic focussing beam and will usually leap into the air as soon as the shutter release button is pressed. Even with the shutter speed set to 1/1000s I have many images with just the trailing long legs of the flies as they react and leap out of the image frame. Fast shutter speeds are essential for most of the subjects and macro situations I photograph.
Fast shutter speeds combined with small aperture size are one of the reasons for me using a flash unit for macro subjects. At fast speeds and small apertures, the amount of light passing to the camera sensor is minimal and can result in very dark images where most of the subject detail (an important component of NatureMapr contributions) is irrevocably lost. To compensate for this, I use the flash unit’s high-speed synchronised flash (the flash is automatically synchronised with the camera shutter speed) and I manually adjust the camera’s ISO speed (the sensitivity of the particular camera) to suit. I’ve learnt from trial and error what the best ISO speed is for the camera I use and the type of macro work I do. I typically use around ISO 400 and avoid much higher values to prevent graininess in the final image. (Cameras far more modern than mine can use significantly higher ISO values without image graininess occurring).
Another consideration for producing sharp, in-focus images of small and active subjects is where to focus the camera (the focal point) and how this can be adversely affected by the camera equipment and the surface at the focal point. My 100mm macro lens uses an ultrasonic beam to automatically focus on the focal point but isn’t always accurate with surfaces which absorb or scatter the beam. These surfaces include very reflective, shiny, metallic or dark surfaces, as well as water, ice and the like. Focussing on a shiny metallic beetle for example may require manually focussing the lens either through the LCD monitor or the viewfinder eyepiece, rather than automatic focussing. This is a reason to frequently check the accuracy of the viewfinder dioptric setting as previously mentioned.
Deciding where to place the camera’s focal point can affect the amount of in-focus detail in the image. As mentioned earlier, an image’s depth of field covers the sharpest in-focus distance in front of and behind the focal point. At macro photography scales the depth of field can be wafer thin in comparison to the subject size, which means that parts of the subject can be out of focus depending on where the focal point is placed. It’s important to ensure the focal point is placed on the subject such that the depth of field provides sharp detail in the area I’m interested in. When photographing insects, I usually don’t just focus on the insect’s head if doing so places the body out of focus and I’m looking for details of the body. It’s better to focus the camera just behind the head and get most of the head in front of the focal point and most of the body behind it, in focus.
Aperture size, focal point, depth of field, ISO settings and the like are all important considerations which can influence the quality and value of images, particularly macro images of small and active subjects. In my experience, the quality and value of images (for all types of photography and photographic subjects) are enhanced by learning what the various camera controls do, how they work, how they can be manually adjusted, and what effect those adjustments have on the photographer’s work.
7. Practical Advice on Taking Macro Images
This part of the Guide covers some practical advice on taking macro images of various subjects based on my personal experience and interests.
Image Preview
Where possible, I try to take an initial image of the subject and then check that image using the camera’s playback button and LCD monitor. I check the light curve, overall exposure, focal point and look for dust marks on the image or unwanted flash reflections and overexposed/underexposed areas. I check the subject’s arrangement within the image and the subject’s background. This allows adjustments to be made to the camera settings and the perspective before I commit to what could otherwise be useless images.
Live and Dead Insects
I prefer working with live insects, spiders and other subjects where possible. This is more challenging and, in my view, produces better and more natural results than working with dead insects. Whilst the latter provides greater detail and is necessary for multiple-image focus stacking, live insects provide more dynamic photos and pleasantly unexpected behaviours as they go about their lives. Working with live insects, however, requires a degree of respect and some control over their behaviour, as discussed below.
Live Insect Control
Many insects will feel threatened by the proximity of the photographer or the camera lens and will usually try to escape. Similarly, if my shadow falls on the subject when approaching it, it will most likely feel threatened and try to escape. I’ve found that where possible, it’s better to avoid this 'escape' situation when approaching insects, spiders and other subjects.
Where I’m unable to approach a subject such as an insect without startling it, I try to take an initial image of where it was found (to record the environment and location) and then carefully capture it in a small plastic container. This allows me to place the insect into an environment where I can photograph it without it feeling threatened. Many insects will calm down in this situation particularly if the box contains something familiar for them to perch on such as a leaf or twig.
Some insects and other subjects simply don’t calm down and others may be too dangerous to handle, such as aggressive wasps and spiders. In this situation they can be photographed early morning when they’ve cooled down overnight and are sluggish. Alternatively, I artificially cool down the subject by placing the plastic box containing it into a fridge for anywhere between 5 and 15 minutes, regularly checking to ensure it’s ok. The cooling down time depends on the subject, with some being very hardy and requiring the longest time. (This cooling down technique is based on insects, spiders and the like becoming less active as ambient temperature drops and is used by photographers, researchers etc for various reasons. When done carefully it will not harm the subject).
Once the subject has cooled down and is less active it’s placed on an appropriate background to photograph as it warms up and eventually leaves. Many insects have dust, pollen, spider’s web or other debris on them. In this situation it’s better not to touch, try to clean, or attempt to manipulate them whilst warming up because even though they are relatively immobile they remain conscious and will feel threatened. In this situation, they will usually struggle to leave as they warm up, which minimises the time available to photograph them in a calm state.
In humid climates, condensation can form on cooled-down subjects. Whilst this may detract from photographing their details it also provides a photographic opportunity for images showing them clearing away the water drops.
Handle with Care
I’ve found that photographic opportunities are improved by respecting subjects such as insects, spiders and the like, by avoiding directly handling them, and where this isn’t possible, then handling them with appropriate care. Many insects can bite, stab, sting and generally ruin your day.
Background, Mounting and Bokeh
A suitable background is an important consideration when taking digital images. As I take images, I assess both the subject and its background and try to find a perspective where they complement each other.
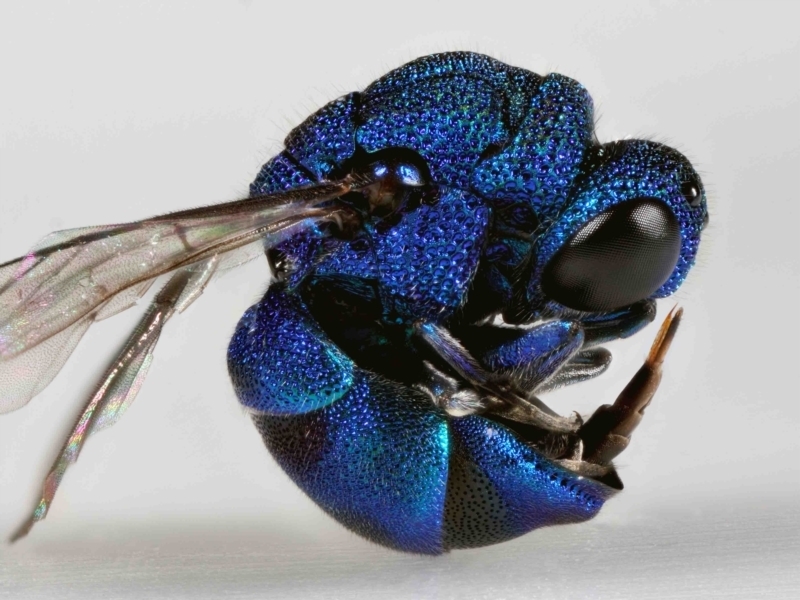
For detailed macro images I usually mount subjects on a simple background to photograph them, typically white card or paper. This provides images where the focus is on the subject and its details rather than on a potentially distracting background. Importantly, this background allows ‘white balance’ colour correction during image processing as the white card/paper colour is a known. (Colour correction is an important consideration when processing images for personal use or as a NatureMapr contribution. Identification accuracy is helped by image details that are based on illumination by a white source rather than a colour tinted source. Correct colours of flowers, plants and insects are an obvious example of this).
Some photographers mount their subjects (insects, fungi, flowers etc) on graph paper as this records the subject’s dimensions, whilst others mount on materials that are relevant to the subject, such as leaves or bark, giving the appearance of a natural environment. The background choice depends to some extent on what the photographer is trying to achieve (an aesthetic image, detailed information, etc) and is a matter of personal taste and artistic flair.
The background of an image can enhance or detract from it. When taking images, I try to allow for the background and its effect (Bokeh) on the appearance of the subject within the image and on the overall image.
Bokeh describes the ‘character’ of the out-of-focus background of an image. A pleasant soft bokeh usually adds to the attractiveness of an image by complimenting it without distracting from the subject. A harsh bokeh can have the opposite effect. Bokeh usually depends on the type and optical quality of the lens used, the lens focal length, the size and shape of the lens aperture, and how well the lens is corrected for spherical aberration. (Spherical aberration occurs where light rays passing through the various camera lens elements are refracted or ‘bent’ by different amounts, causing blurred images. Camera lenses are usually designed to minimise spherical aberration to some extent).
A final word on backgrounds. When subjects are mounted on white card or paper then at macro scale magnifications and depths of field, the card or paper fibres can appear in the image background and detract from it. I overcome this by placing a sheet of glass on top of the card or paper and the subject on the glass. The thickness of the sheet of glass is such as to remove the card or paper fibres out of the depth of field and blur them.
Weather Conditions and Seasons
There are many photographic opportunities throughout the year and the often-heard comment that there’s not much insect life around in winter, is simply not true. It’s important to photograph subjects year-round, in different weather conditions and seasons for many reasons. NatureMapr contributions add to collective knowledge about the distribution of subjects across both space and time. By going out photographing in all seasons and weathers not only are different photographic opportunities presented, but records are obtained of how, where and which subjects come and go throughout the year. Whilst going out to photograph in pouring rain and freezing conditions is probably mildly insane, it’s always been very productive. Fungi love soaking wet conditions and subjects such as slugs, snails, millipedes, and leeches are out in force in the cold and rain.
Water Drops
When taking macro photographs of subjects such as insects and flowers in the rain, some thought should be given to the optical complexity introduced by water drops. If a subject such as a beetle has water drops on it, then the images seen within the water drops are not actually where they appear to be and focussing on one of them can affect the overall composition and sharpness of the final image. Images seen within water drops are either ‘real’ or ‘virtual’ as described below.
Real images:
Where a water drop sits on top of a subject such as a beetle, the water drop acts as a simple convex lens. The image of the background that appears in the water drop depends on the water drop’s focal length and on the background’s location relative to the beetle. The water drop in this situation produces a ‘real’ image which is condensed, inverted, back-to-front and in front of the water drop. If the photographer focusses on the image formed by the water drop, then the focal point is in front of the beetle and not at the beetle. At macro scales the result can be that the image within the water drop is in sharp focus, but the beetle isn’t.
Virtual images:
Where a water drop is seen on the side of a beetle then the drop acts like a convex magnifying lens. The image seen within the water drop is a magnified ‘virtual’ image meaning that it’s the right way up and the correct way around but formed behind the adjacent surface of the beetle. If the photographer focusses on the image formed by this water drop, then the focal point is behind the beetle’s adjacent surface and not on the beetle. At macro scales the result can be that the image within the water drop is in sharp focus, but the beetle isn’t.
When taking photographs of subjects with water drops on them, it’s important to be aware of real and virtual images and to adjust the focal point to where it should be to get the required result.
Image Perspectives
This subject is discussed above under ‘Contribution Image Limits’ and ‘Perspectives.’ Equally important to this topic are the following considerations.
When taking images, I try to get down to the same level as the subject because the perspective is different to that taken from a human’s perspective, typically high above the subject. A perspective at the subject’s level shows the world and surroundings from the subject’s point of view. Looking down on an ant foraging across the ground is an entirely different perspective, and has different detail and information, to a close-up view of the ant taken at its level as it struggles with leaves and other debris.
Taking perspectives at the subject’s level can also make images easier to view. Where an insect is on a vertical surface such as a tree, I initially take images orientated vertically to record how the insect was found but then rotate the camera through 90° and take additional images. I find this rotated perspective produces images which are visually easier to take in, particularly when it comes to fine detail. This is also a situation where a flash unit helps because the resulting horizontally orientated perspective will have illumination consistent with that orientation. This isn’t the case with a horizontally orientated perspective of a subject on a vertical surface that is illuminated by sunlight.
Views of the underside of an insect can provide NatureMapr’s moderators with important identification details. However, this can be difficult to obtain under naturally occurring circumstances such as the infrequent sighting of an insect on a windowpane. To overcome this, I create an artificial ‘windowpane’ by placing the insect in a plastic box covered with a sheet of glass. Most insects will explore the complete extent of the box including working their way across the underside of the glass. As they do this, their undersides can be photographed. Understanding the reason why insects can walk across the underside of a sheet of glass also provides some insight into photographic opportunities as described below.
8. Photographic Opportunities
This final part of the Guide covers some practical advice on how to improve photographic opportunities based on my personal experience and interests.
Van der Waals Forces
Many insects, spiders and animals such as geckos, can easily attach to very smooth surfaces as they land or walk. This includes the underside of a sheet of glass as described above in ‘Image Perspectives.’ Many insects including wasps can land or stand on water without penetrating the surface. Knowing how they do this provides photographic opportunities. One of the reasons is due to ‘Van de Waals Forces.’
These forces act between atoms or molecules and importantly, they are distance-dependent and can be both attractive and repulsive. The feet of some insects, geckos, some hunting spiders etc, have pads that are often covered with tiny hairs or setae. These hairs branch out into smaller fibres which then further branch to even smaller fibres. Miniscule van der Waals’ forces act on the large numbers of these small fibres on each furry seta resulting in an overall attractive force sufficiently strong to overcome the subject’s weight. However, because the forces are repulsive at even closer distances between atoms and molecules, they also prevent the subject from sticking permanently to the surface.
These forces also allow insects such as wasps to land on water without penetrating through the surface. If there is a bird bath or similar small body of water nearby, I check for photographic opportunities such as bees drinking at the water’s edge or insects such as wasps standing on the water surface to collect water for their mud nests.
Handrails
Bridge and footpath handrails provide good opportunities for sightings. They are variously used as convenient forage ways, resting places, for warming up (skinks and lizards), ambush locations (leeches during rain) and usually have various jumping spiders in residence.
Look where you go
When searching for photographic subjects on tree trunks, bushes and the like I always look where I’m moving to before making the move. Frequently there will be a butterfly or other insect on an adjacent bush or tree and if I approach too quickly or cast a shadow on them, they will usually leave. It’s better to look ahead and avoid alarming a potential subject and losing the sighting.
Search Carefully
Many large and small insects are masters of camouflage and can hide in plain sight without being noticed during a cursory look. Two-tailed spiders are a good example. It’s always better to take a slow and close look at prospective insect locations such as bushes and tree trunks than a cursory look in passing.
Do the Research
With any particular subject, I give some thought to what end result I’m trying to achieve and how to achieve it. By doing upfront research I can learn about potential photographic subjects, consider what challenges they present, and work out beforehand what techniques I need to use to achieve my aim of photographing them in action. Photographing Potter wasps, Mud-daubing wasps and Leaf-cutter bees are good examples of this.
Know your Subject
Knowing your subject’s behaviour provides additional photographic opportunities. An example of this is Weevils, some of which have a defence strategy of falling from their perch and then feigning death. When taking images of Weevils on their perch, I use one hand to operate the camera and place the other hand below the Weevil. If it falls from the perch whilst I’m taking images, then instead of disappearing into the undergrowth, it falls into my hand. I can then place the Weevil on the ground and whilst it feigns death, take multiple closeup images of it. This strategy for increasing photographic opportunities should work with other subjects once their behaviour has been observed and understood.
Patience
Supposedly a virtue but an insect photographer’s essential tool. I’ve found that patiently waiting for some insects to settle down after alighting, produces photographic opportunities, with Dragonflies and Damselflies being good examples. Whilst hunting for prey they will frequently alight on a suitable perch. If approached immediately after alighting, most Dragonflies and Damselflies will immediately leave the area and the photographic opportunity will be lost. I’ve noticed that quite often when these insects alight, they appear to take a short nap before taking off again. Therefore, if I see them alight then I allow a short amount of time to pass before approaching them. This way they often don’t take off immediately and I can get very close up images of them from all perspectives.
Learn from Experience and Example
Looking in detail at images I’ve recently taken is one way to improve photographic opportunities by learning what worked and didn’t work and importantly, why. A similar comment applies to reviewing the NatureMapr contributions of others. If done critically it allows me to develop strategies for when I’m facing the same situation and allows me to progressively improve my photography and environmental skills.
Images within Images
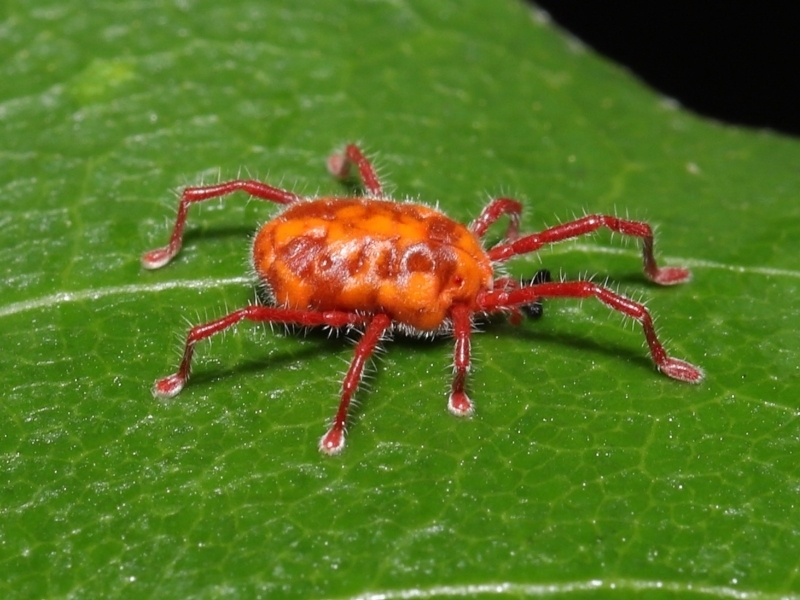
With modern full-frame, high-resolution sensor cameras, a large amount of data can be contained within a single image, much of which can go unnoticed and unused. When it comes to macro images of insects, inspecting them in greater detail sometimes provides an unexpected sighting such as a mite off to one side of the image with a smaller mite attached to it.
These unexpected sightings form images in their own right. Photographic opportunities can be enhanced by systematically looking for the image within the image.

9. Conclusion
If you’ve read this far then you deserve a reward. Hopefully that comes from taking something positive from the Guide that enhances your skills and experience and allows you to contribute images to NatureMapr that reflect your interests and style, and are personally rewarding, creative and enjoyable for you.
Tim Leach